本教程来自社区贡献,不受 Open WebUI 团队官方支持。它仅作为如何根据特定用例自定义 Open WebUI 的示例。想要贡献?请查看贡献教程。
🌐 网页搜索
本指南介绍如何在 Open WebUI 中配置各种搜索引擎来实现网页搜索功能。
SearXNG (Docker)
"SearXNG 是一个免费的元搜索引擎,它可以聚合多个搜索服务和数据库的结果。完全保护用户隐私,不会跟踪或分析用户行为。"
1. SearXNG 配置
按照以下步骤配置 SearXNG,使其能够与 Open WebUI 最佳配合:
步骤 1:克隆并准备 SearXNG Docker
- 创建
searxng-docker目录
克隆 searxng-docker 仓库,该目录将存放所有 SearXNG 配置文件。详细配置说明请参考 SearXNG 文档。
git clone https://github.com/searxng/searxng-docker.git
进入仓库目录:
cd searxng-docker
步骤 2:配置 .env 文件
- 在
.env文件中启用并设置SEARXNG_HOSTNAME:
# 默认监听 https://localhost
# 如需修改:
# * 取消注释 SEARXNG_HOSTNAME 并设置 SearXNG 主机名
# * 如需 SSL 证书,取消注释 LETSENCRYPT_EMAIL 并填写您的邮箱

SEARXNG_HOSTNAME=localhost:8080/
# LETSENCRYPT_EMAIL=<email>

# 可选配置:
# 对于特小或特大实例,您可能需要调整 uwsgi 工作进程数和每进程线程数
# 工作进程越多,可以同时处理的搜索请求越多,但会消耗更多资源

# SEARXNG_UWSGI_WORKERS=4
# SEARXNG_UWSGI_THREADS=4
步骤 3:修改 docker-compose.yaml 文件
- 解除
localhost限制:
sed -i "s/127.0.0.1:8080/0.0.0.0:8080/"
步骤 4:设置权限
- 允许容器创建配置文件:
sudo chmod a+rwx searxng-docker/searxng
步骤 5:创建 limiter.toml 配置文件
- 创建以下配置文件
searxng-docker/searxng/limiter.toml:
searxng-docker/searxng/limiter.toml
# 更新默认配置
# 详见 https://github.com/searxng/searxng/blob/master/searx/botdetection/limiter.toml

[botdetection.ip_limit]
# 禁用 IP 限制中的链接令牌
link_token = false

[botdetection.ip_lists]
block_ip = []
pass_ip = []
步骤 6:删除旧配置文件
- 删除现有的
settings.yml文件(如果存在),系统会在首次启动时自动生成新文件:
rm searxng-docker/searxng/settings.yml
步骤 7:生成新配置文件
首次运行时,需要临时从 docker-compose.yaml 中删除 searxng 服务的 cap_drop: - ALL 配置,这样才能成功创建 uwsgi.ini 文件。完成首次运行后,请务必重新添加此安全配置。
- 临时启动容器以生成配置文件:
docker compose up -d ; sleep 10 ; docker compose down
步骤 8:更新配置
- 在
settings.yml中添加所需格式:
sed -i 's/formats: \[\"html\"\/]/formats: [\"html\", \"json\"]/' searxng-docker/searxng/settings.yml
生成安全密钥:
sed -i "s|ultrasecretkey|$(openssl rand -hex 32)|g" searxng-docker/searxng/settings.yml
Windows 用户可使用此 PowerShell 脚本生成密钥:
$randomBytes = New-Object byte[] 32
(New-Object Security.Cryptography.RNGCryptoServiceProvider).GetBytes($randomBytes)
$secretKey = -join ($randomBytes | ForEach-Object { "{0:x2}" -f $_ })
(Get-Content searxng-docker/searxng/settings.yml) -replace 'ultrasecretkey', $secretKey | Set-Content searxng-docker/searxng/settings.yml
设置端口:
sed -i 's/port: 8080/port: 8080/' searxng-docker/searxng/settings.yml
设置监听地址:
sed -i 's/bind_address: "0.0.0.0"/bind_address: "127.0.0.1"/' searxng-docker/searxng/settings.yml
配置文件说明
settings.yml 配置示例
settings.yml 包含了引擎的主要配置项,以下是基础配置示例:
searxng-docker/searxng/settings.yml
# 详见 https://docs.searxng.org/admin/settings/settings.html#settings-use-default-settings
use_default_settings: true

server:
  # base_url 由环境变量 SEARXNG_BASE_URL 定义
  secret_key: "ultrasecretkey"  # 必须修改!
  limiter: true  # 私有实例可禁用
  image_proxy: true
  port: 8080
  bind_address: "0.0.0.0"

ui:
  static_use_hash: true

search:
  safe_search: 0
  autocomplete: ""
  default_lang: ""
  formats:
    - html
    - json # 必需
  # 支持的格式:[html, csv, json, rss]
redis:
  # Redis 连接配置,可被环境变量 SEARXNG_REDIS_URL 覆盖
  url: redis://redis:6379/0
注意:settings.yml 中的端口必须与 docker-compose.yml 中的设置一致。
步骤 9:配置 uwsgi.ini
- 确保
uwsgi.ini内容如下:
searxng-docker/searxng/uwsgi.ini
[uwsgi]
# 运行用户和组
uid = searxng
gid = searxng

# 工作进程数(默认为 CPU 核心数)
workers = %k

# 每进程线程数(默认为 4)
threads = 4

# Socket 权限
chmod-socket = 666

# 基础配置
single-interpreter = true
master = true
plugin = python3
lazy-apps = true
enable-threads = 4

# 应用配置
module = searx.webapp

# 路径配置
pythonpath = /usr/local/searxng/
chdir = /usr/local/searxng/searx/

# 进程命名
auto-procname = true

# 日志设置
disable-logging = true
log-5xx = true

# 请求大小限制
buffer-size = 8192

# 连接设置
add-header = Connection: close

# 静态文件配置
static-map = /static=/usr/local/searxng/searx/static
static-expires = /* 86400
2. 其他设置选项
除了使用 SearXNG,您还可以选择使用其他搜索引擎服务。以下是一些可用的选项:
Bing 搜索
- 访问 Azure 门户 创建新资源。创建完成后,您将被重定向到资源概览页面。在那里,选择"点击此处管理密钥"。
- 在密钥管理页面,找到 Key1 或 Key2 并复制您想要使用的密钥。
- 打开 Open WebUI 管理面板,切换到设置标签页,然后选择网页搜索。
- 将您的 Bing API 密钥粘贴到相应字段中。
Google 搜索
要使用 Google 搜索,您需要:
- 获取 Google 搜索 API 密钥
- 在 Open WebUI 管理面板中配置该密钥
- 选择 Google 作为默认搜索引擎
使用说明
配置完成后,您可以:
- 在对话中使用自然语言请求搜索信息
- 使用特定的搜索命令进行精确搜索
- 结合其他功能使用搜索结果
2. Alternative Setup
Alternatively, if you don't want to modify the default configuration, you can simply create an empty searxng-docker folder and follow the rest of the setup instructions.
Docker Compose Setup
Add the following environment variables to your Open WebUI docker-compose.yaml file:
services:
  open-webui:
    environment:
      ENABLE_RAG_WEB_SEARCH: True
      RAG_WEB_SEARCH_ENGINE: "searxng"
      RAG_WEB_SEARCH_RESULT_COUNT: 3
      RAG_WEB_SEARCH_CONCURRENT_REQUESTS: 10
      SEARXNG_QUERY_URL: "http://searxng:8080/search?q=<query>"
Create a .env file for SearXNG:
# SearXNG
SEARXNG_HOSTNAME=localhost:8080/
Next, add the following to SearXNG's docker-compose.yaml file:
services:
  searxng:
    container_name: searxng
    image: searxng/searxng:latest
    ports:
      - "8080:8080"
    volumes:
      - ./searxng:/etc/searxng:rw
    env_file:
      - .env
    restart: unless-stopped
    cap_drop:
      - ALL
    cap_add:
      - CHOWN
      - SETGID
      - SETUID
      - DAC_OVERRIDE
    logging:
      driver: "json-file"
      options:
        max-size: "1m"
        max-file: "1"
Your stack is ready to be launched with:
docker compose up -d
On the first run, you must remove cap_drop: - ALL from the docker-compose.yaml file for the searxng service to successfully create /etc/searxng/uwsgi.ini. This is necessary because the cap_drop: - ALL directive removes all capabilities, including those required for the creation of the uwsgi.ini file. After the first run, you should re-add cap_drop: - ALL to the docker-compose.yaml file for security reasons.
Alternatively, you can run SearXNG directly using docker run:
docker run --name searxng --env-file .env -v ./searxng:/etc/searxng:rw -p 8080:8080 --restart unless-stopped --cap-drop ALL --cap-add CHOWN --cap-add SETGID --cap-add SETUID --cap-add DAC_OVERRIDE --log-driver json-file --log-opt max-size=1m --log-opt max-file=1 searxng/searxng:latest
3. Confirm Connectivity
Confirm connectivity to SearXNG from your Open WebUI container instance in your command line interface:
docker exec -it open-webui curl http://host.docker.internal:8080/search?q=this+is+a+test+query&format=json
4. GUI Configuration
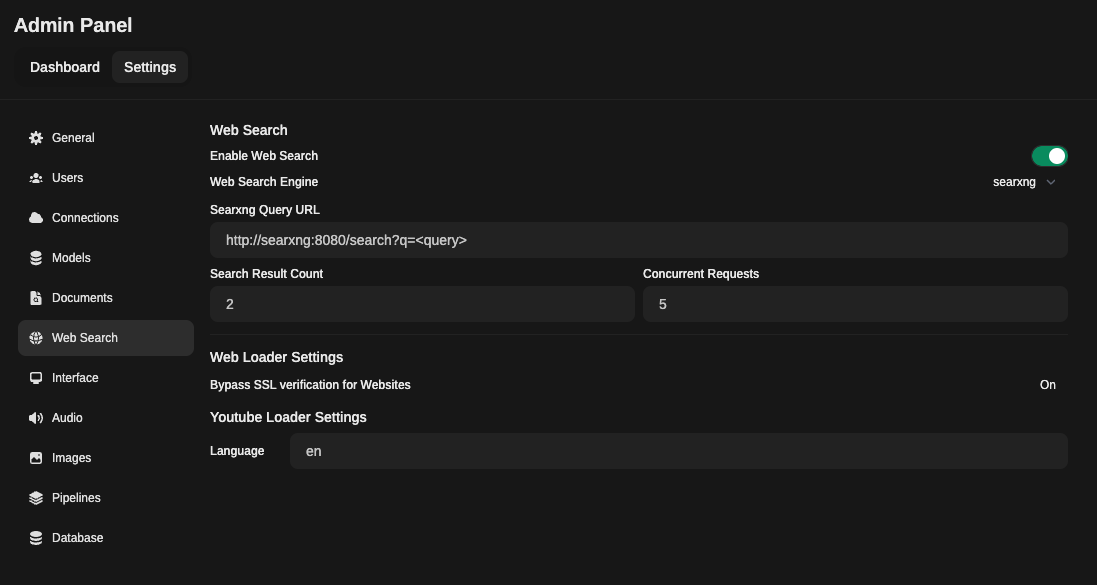
- Navigate to:
Admin Panel->Settings->Web Search - Toggle
Enable Web Search - Set
Web Search Enginefrom dropdown menu tosearxng - Set
Searxng Query URLto one of the following examples:
http://searxng:8080/search?q=<query>(using the container name and exposed port, suitable for Docker-based setups)http://host.docker.internal:8080/search?q=<query>(using thehost.docker.internalDNS name and the host port, suitable for Docker-based setups)http://<searxng.local>/search?q=<query>(using a local domain name, suitable for local network access)https://<search.domain.com>/search?q=<query>(using a custom domain name for a self-hosted SearXNG instance, suitable for public or private access)
注意:/search?q=<query> 部分是必需的。
- 根据需要调整"搜索结果数量"和"并发请求数"的值
- 保存更改
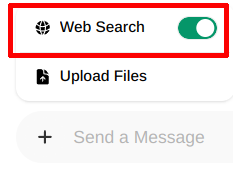
5. 在聊天中使用网页搜索
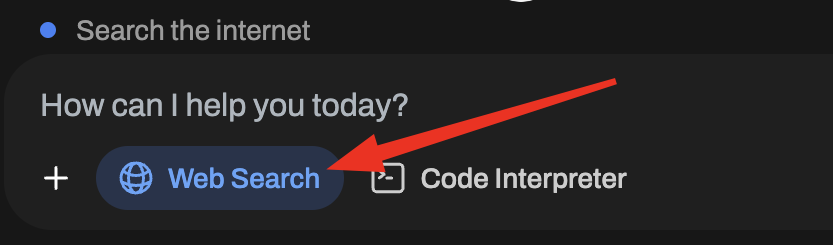
要访问网页搜索功能,请点击消息输入框旁边的 + 号。
在这里您可以打开/关闭网页搜索功能。

按照以上步骤,您就可以成功地在 Open WebUI 中设置 SearXNG,从而使用 SearXNG 引擎进行网页搜索。
注意事项
- 您需要在每个聊天中手动打开/关闭此功能。
- 此功能是基于会话的,例如:重新加载页面或切换到另一个聊天会关闭该功能。
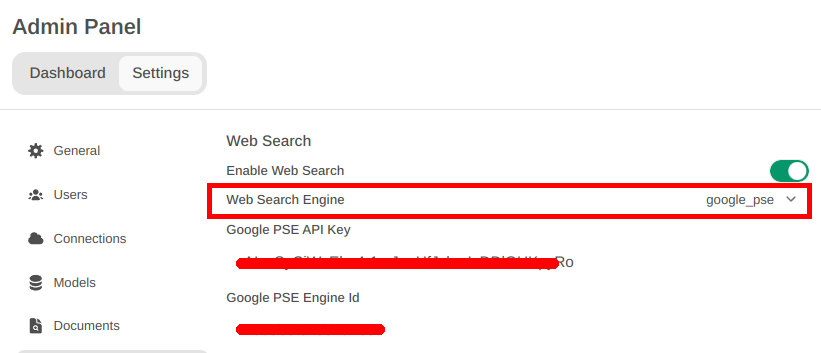
Google PSE API
设置步骤
- 访问 Google Developers,使用 可编程搜索引擎,登录或创建账户。
- 进入控制面板并点击"添加"按钮
- 输入搜索引擎名称,根据需要设置其他属性,验证您不是机器人,然后点击"创建"按钮。
- 生成
API 密钥并获取搜索引擎 ID(在创建引擎后可用)。 - 使用
API 密钥和搜索引擎 ID,打开Open WebUI 管理面板,点击设置标签,然后点击网页搜索 - 启用
网页搜索并将网页搜索引擎设置为google_pse - 在
Google PSE API 密钥中填入API 密钥,在Google PSE 引擎 ID中填入搜索引擎 ID(第 4 步获取的) - 点击
保存
注意事项
您需要在提示框中使用加号(+)按钮启用网页搜索。
开始搜索吧 ;-)
Brave API
Docker Compose 设置
在您的 Open WebUI docker-compose.yaml 文件中添加以下环境变量:
services:
  open-webui:
    environment:
      ENABLE_RAG_WEB_SEARCH: True
      RAG_WEB_SEARCH_ENGINE: "brave"
      BRAVE_SEARCH_API_KEY: "YOUR_API_KEY"
      RAG_WEB_SEARCH_RESULT_COUNT: 3
      RAG_WEB_SEARCH_CONCURRENT_REQUESTS: 10
Mojeek 搜索 API
设置步骤
- 请访问 Mojeek 搜索 API 页面 获取
API 密钥 - 使用
API 密钥,打开Open WebUI 管理面板,点击设置标签,然后点击网页搜索 - 启用
网页搜索并将网页搜索引擎设置为mojeek - 在
Mojeek 搜索 API 密钥中填入API 密钥 - 点击
保存
Docker Compose 设置
在您的 Open WebUI docker-compose.yaml 文件中添加以下环境变量:
services:
  open-webui:
    environment:
      ENABLE_RAG_WEB_SEARCH: True
      RAG_WEB_SEARCH_ENGINE: "mojeek"
      BRAVE_SEARCH_API_KEY: "YOUR_MOJEEK_API_KEY"
      RAG_WEB_SEARCH_RESULT_COUNT: 3
      RAG_WEB_SEARCH_CONCURRENT_REQUESTS: 10
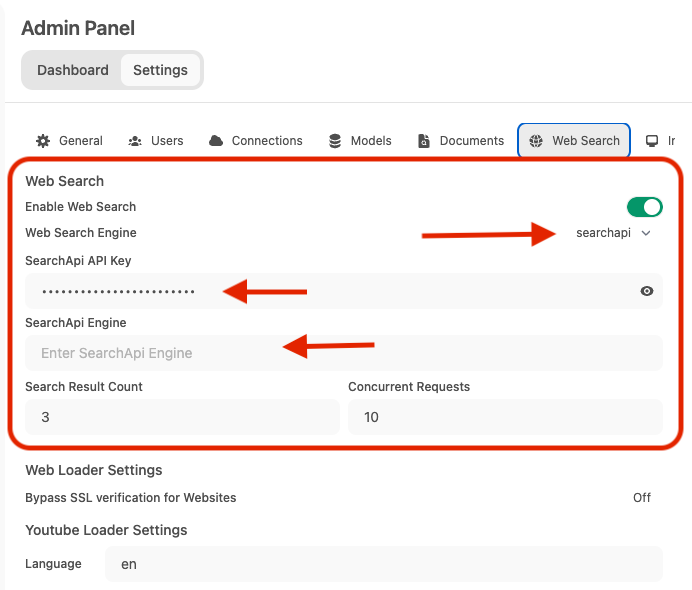
SearchApi API
SearchApi 是一个实时 SERP API 集合。支持任何返回 organic_results 的现有��或即将推出的 SERP 引擎。默认的网页搜索引擎是 google,但可以更改为 bing、baidu、google_news、bing_news、google_scholar、google_patents 等。
设置步骤
- 访问 SearchApi,登录或创建新账户。
- 进入
仪表板并复制 API 密钥。 - 使用
API 密钥,打开Open WebUI 管理面板,点击设置标签,然后点击网页搜索。 - 启用
网页搜索并将网页搜索引擎设置为searchapi。 - 在
SearchApi API 密钥中填入您从 SearchApi 仪表板复制的API 密钥。 - [可选] 输入您想要查询的
SearchApi 引擎名称。例如:google、bing、baidu、google_news、bing_news、google_videos、google_scholar和google_patents。默认设置为google。 - 点击
保存。
注意事项
您需要在提示框中使用加号(+)按钮启用网页搜索,�以使用 SearchApi 引擎进行搜索。
Kagi API
即将推出
设置步骤
Serpstack API
即将推出
设置步骤
Serper API
即将推出
设置步骤
Serply API
即将推出
设置步骤
DuckDuckGo API
设置步骤
Open WebUI 的内置网页搜索不需要任何设置就可以使用 DuckDuckGo API!DuckDuckGo 可以在 Open WebUI 中直接使用。
您的网页搜索可能会受到速率限制。
Tavily API
即将推出
设置步骤
Jina API
即将推出