⚙️ 什么是工具?
工具是为您的大语言模型添加超能力的小型Python脚本。启用后,它们允许您的聊天机器人执行令人惊叹的功能——比如搜索网络、抓取数据、生成图像、使用AI语音回应等等。
将工具想象成您的AI在与您聊天时可以使用的有用插件。
🚀 工具能帮助我做什么?
以下是工具让您的AI助手能够执行的一些示例:
- 🌍 网络搜索:通过搜索互联网获取实时答案。
- 🖼️ 图像生成:根据您的提示创建图�像。
- 🔊 语音输出:使用ElevenLabs生成AI语音。
在这里探索即用工具:
🧰 工具展示
📦 如何安装工具
在Open WebUI中安装工具有两种简单方法:
- 访问 社区工具库
- 选择一个工具,然后点击获取按钮。
- 输入您的Open WebUI实例的IP地址或URL。
- 点击"导入到WebUI"——完成!
🛑 安全提示:永远不要导入您不认识或不信任的工具。这些是Python脚本,可能运行不安全的代码。
🔧 如何在Open WebUI中使用工具
一旦您安装了工具(我们将在下面向您展示如何安装),以下是如何启用和使用它们:
您有两种方式为模型启用工具:
➕ 选项1:从聊天窗口启用
在聊天时,点击输入区域中的➕图标。您将看到可用工具列表——您可以随时为该会话启用其中任何一个。
💡 提示:启用工具给模型使用权限——但它可能不会使�用,除非对任务有用。
✏️ 选项2:默认启用(推荐频繁使用)
- 前往:工作空间 ➡️ 模型
- 选择您正在使用的模型(如GPT-4或LLaMa2)并点击✏️编辑图标。
- 向下滚动到"工具"部分。
- ✅ 勾选您希望模型默认访问的工具。
- 点击保存。
这确保模型在您与其聊天时始终准备好使用这些工具。
您还可以使用AutoTool过滤器让您的LLM自动选择正确的工具:
🎯 注意:即使使用AutoTool,您仍需要使用选项2启用您的工具。
✅ 就是这样——您的LLM现在已经具备工具能力!您已准备好通过网络搜索、图像生成、语音输出等为您的聊天增强功能。
🧠 选择工具使用方式:默认模式与原生模式
一旦为您的模型启用了工具,Open WebUI为您提供两种不同的方式让您的LLM在对话中使用它们。
您可以通过选择以下方式来决定模型应该如何调用工具:
- 🟡 默认模式(基于提示)
- 🟢 原生模式(内置函数调用)
让我们详细分析:
🟡 默认模式(基于提示的工具触发)
这是Open WebUI中的默认设置。
在这里,您的LLM不需要原生支持函数调用。相反,我们使用智能工具选择提示模板指导模型选择和使用工具。
✅ 适用于几乎任何模型
✅ 使用基础或本地模型解锁工具的好方法
❗ 在链式工具调用时不如原生模式可靠或灵活
🟢 原生模式(内置函数调用)
如果您的模型确实支持"原生"函数调用(如GPT-4o或GPT-3.5-turbo-1106),您可以使用这种强大模式让LLM实时决定——在单个聊天消息中何时以及如何调用多个工具。
✅ 快速、准确,可以在一个响应中链接多个工具
✅ 最自然和先进的体验
❗ 需要实际支持原生函数调用的模型
✳️ 如何在模式之间切换
想要在聊天中启用原生函数调用?操作如下:
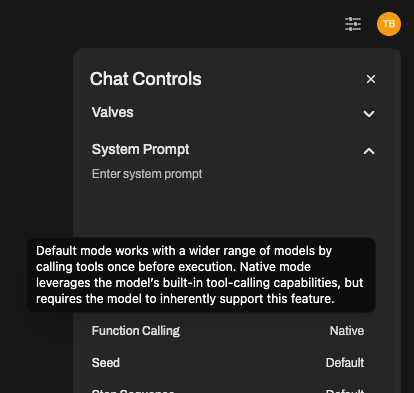
- 使用您的模型打开聊天窗口。
- 点击⚙️聊天控制 > 高级参数。
- 查找函数调用设置并将其从默认切换到原生
就是这样!您的聊天现在使用真正的原生工具支持(只要模型支持)。
➡️ 我们推荐使用GPT-4o或其他OpenAI模型以获得最佳原生函数调用体验。
🔎 一些本地模型可能声称支持,但通常在准确或复杂的工具使用方面存在困难。
💡 总结:
| 模式 | 适用对象 | 优点 | 缺点 |
|---|---|---|---|
| 默认 | 任何模型 | 广泛兼容性,更安全,灵活 | 可能不太准确或较慢 |
| 原生 | GPT-4o等 | 快速,智能,出色的工具链接 | 需要适当的函数调用支持 |
选择最适合您设置的模式——请记住,您随时可以通过聊天控制进行切换。
👏 就是这样——您的LLM现在知道如何以及何时智能地使用工具。
🧠 总结
工具是帮助您的AI模型做更多事情而不仅仅是聊天的插件。从回答实时问题到生成图像或大声说话——工具让您的AI栩栩如生。
- 访问:https://openwebui.com/tools 发现新工具。
- 手动安装或一键安装。
- 从工作空间 ➡️ 模型为每个模型启用它们。
- 通过点击➕在聊天中使用它们
现在去让您的AI变得超级智能吧 🤖✨